Local Low Latency VR Casting with Moonlight
An introduction
PCVR vs Standalone
So I just got a new Meta Quest 3 headset, and was setting up Beat Saber on it. For the uninitiated, there are 2 primary ways you can game on a Virtual Reality headset:
- PCVR
- Standalone
There are also some other options such as PSVR, where it’s sold as an accessory/addonto the PlayStation console. But that thing is dead in the water, at least for now.
PCVR
The game(s) are run on and rendered on your PC, with the visual output being streamed to your headset. This can be wirelessly via things like Airlink, Virtual Desktop, ALVR, or SteamVR. The downside to these methods is latency. In fast paced rhythm based games, lag could be a real issue.
You also have the option to have a tethered connection, which would help with the latency but requires you to be close enough to your PC and have a cable connecting you to it.
Standalone
The game is run on and rendered directly on the headset itself, similar to a mobile phone game. This would have the least amount of lag due to not needing a network connection, but will require storage space on the headset to install games.
My choice is PCVR
For this specific game, I decided to go the PCVR route. Because I believe that my PC with a dedicated mid-ish tier overclocked graphics card has significantly more graphics processing power than the Snapdragon XR2 Gen 2 processor in the headset. It also theoretically would increase the battery life of the headset due to the reduced load on it.
Being also on my PC, it allows for easier modding of the game and it’s config files, if needed.
The Issue
Now while the game is a single player game, I do enjoy sharing it with my partner and taking turns to play. Also, friends may occasionally come over to play. And in such situations, it is definitely a must-have to display what the player sees on a TV, otherwise it would just be really awkward watching the guy/girl swinging arms wildly around.
Using the headset, Virtual Desktop has the built in capability to stream directly to your smart TV via Chromecast or via a browser, but this introduces another layer of latency. The player sees and hears the song on the headset, but due to the mis-sync and latency, the song will be heard again a split second later on the TV’s speakers. I did not measure the exact latency but I would expect it to be in the hundreds of milliseconds.
Now this is obviously a problem. Either the player turns off the headset’s speakers and plays an off-sync song to what he/she is seeing in the headset, or those watching must the TV volume down so much that the player cannot hear it.
The other alternative would be to stream the game window that opens on the PC directly to the TV, but the question is how do I have next to 0 lag?
For reference, using the debug tool in Virtual Desktop I am able to get my latency from PC to Headset to 25-35ms, which based on my Google-fu skills, seem to be almost the best case scenario achievable. if I could get the second stream onto the TV within a 5-50ms range, the audio lag should be near undiscernible to many.
The solution
The solution? Moonlight. Here’s now ChatGPT nicely describes it:
Moonlight is an open-source implementation of NVIDIA’s GameStream protocol, which allows users to stream games and other applications from a PC with an NVIDIA graphics card to other devices. It enables high-performance remote gaming by transmitting the video and audio from the host PC to the client device over a network, while sending back input commands (like keyboard, mouse, or game controller actions) from the client to the host.
Key Features of Moonlight:
- High-Quality Streaming: Supports up to 4K resolution and 120 fps (or even 240 fps with the right hardware and network conditions).
- Low Latency: Optimized to minimize latency, providing a smooth and responsive gaming experience.
- Cross-Platform: Available on various platforms including Windows, macOS, Linux, iOS, Android, and even the Raspberry Pi.
- Free and Open Source: Moonlight is completely free to use and its source code is available for anyone to modify or contribute to.
- Wide Range of Input Support: Supports a variety of input devices including keyboards, mice, touchscreens, and game controllers.
From what I understand, this GameStream protocol was originally designed for Cloud Gaming. If it’s able to achieve low latency gaming over the internet to some cloud somewhere, it’s probably good enough for my use case for streaming over LAN. I just have to configure it to not use any controller or keyboard/mouse input and it is effectively just a low latency high resolution video stream.
This is an early draft of this guide, and I may not have the time to simplify, add images, and elaborate on the steps later on. So for some who are not as technical with computers, some parts will require some additional Googling to understand what I mean
My setup
Before going into how I solved this issue, I should first share how my setup is like, and my hardware.
-
PC connected to router via an Ethernet cable from a different room
- WiFi 6 Router capable of the 5ghz band
- Quest 3 connected to the router via Wi-Fi on the 5ghz band, within 1-2 meters to the router
- Nvidia Shield TV Pro connected to the router via Ethernet cable
- Laser TV receiving the output from the Shield via HDMI
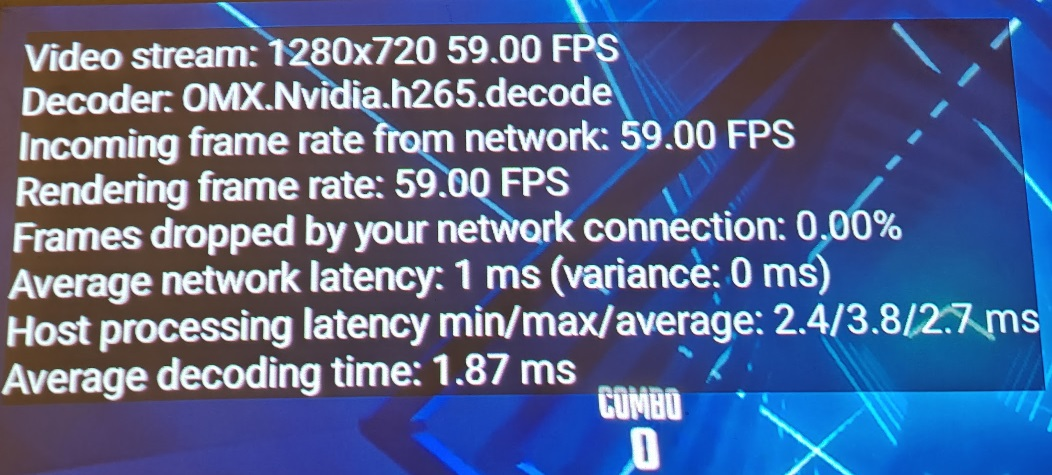
For most people, perhaps the last 2 items can a single smart TV, which should work the same way. But it would be ideal to have it connected via ethernet to reduce every single bit of latency. In my fully wired setup, I achieved an approximate 3-4ms latency streaming from the PC to the TV(this can be checked via the the client app overlay).
Desktop (“The server”) Configuration
First, install Sunshine:
https://github.com/LizardByte/Sunshine
While Moonlight is an Nvidia thing, Sunshine supports GPUs from AMD(which I’m using), Nvidia, and Intel. Once installed, you can run it and it should open your browser to it’s web admin interface. Set up a username and password and you should be good to go.
Optional - Part 1: Installing a Virtual Monitor
This step is optional, but can be applicable if you want to use your PC while the game is running. For example, your partner, famiily member or friends may want to play, but you may require your PC for something else.
You cannot set up Sunshine to stream a specific app for our use-case. This is a VR specific issue.
BECAUSE YOU HAVE TO LAUNCH THE GAME THROUGH THE HEADSET
When you launch the game remotely using the headset(Virtual Desktop in my case), the PC renders 2 ‘outputs’ of the game; one in Virtual Reality that you see in the headset, and another flat image in a window on the PC. In addition, what is seen on the PC may not be what the headset sees if you do some more advanced modding, such as viewing a third person view of the game being played (may write a guide on how to do this later).
If you have a mouse connected to the Moonlight client, you may launch the game through the Moonlight connection, but it won’t detect your headset and display your game in VR. Because of this, I am opting to stream an entire desktop with the game running in full screen, and just launch the game through the headset as per normal.
-
First, download the latest release of VDD:
https://github.com/itsmikethetech/Virtual-Display-Driver/releases
-
Next, unzip the entire “ldddisplaydriver” folder to C:\
-
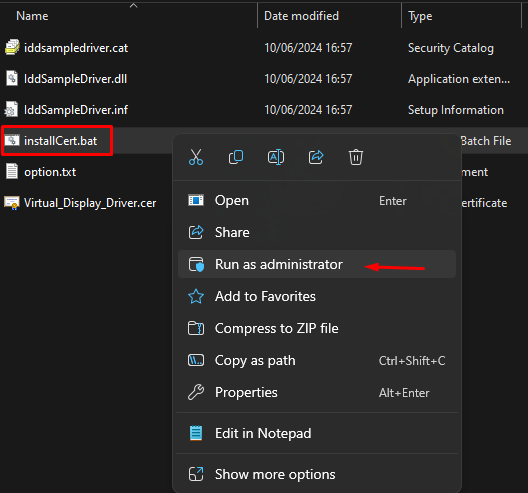
Browser to the folder, run
installcert.batas admin

-
Device Manager -> Action -> Install legacy hardware -> have disk -> go the the ldddisplaydriver -> Finish
-
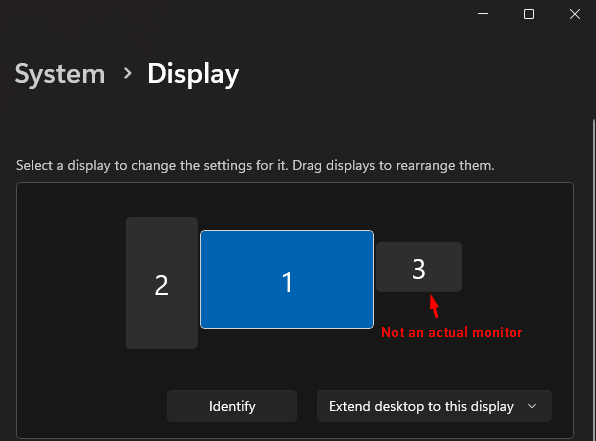
On Desktop, right click and view Display Settings. You should see a new monitor that that doesn’t physically exist. Change the new monitor to some low-ish resolution like 720p or something (Don’t forget to set Beat Saber the same resolution or lower from in-game settings later). This will reduce the load on your GPU as the stream doesn’t require that high a resolution. If you use a Shield TV Pro or similar, the stream will be automatically upscaled anyway.

- Select the new monitor, select
Extend Desktop to this display, then position it to the left or right of an existing monitor. Take note of where it is, in case you lose your mouse cursor and need to move windows around. Because this monitor doesn’t physically exist, you will not be able to see what’s on it.
Enabling and disabling
If at any point you need to enable or disable the virtual monitor:
Windows Display options -> Monitor 3(or whatever) -> disconnect this display
Or “extend” to reenable
Optional - Part 2: Configure Sunshine to use the new monitor
If you don’t have a Virtual Monitor set up, Sunshine will use your default monitor, but if you do, we should configure it to use that monitor instead.
Changing the Sunshine default monitor
Because Sunshine by default streams the main monitor, we will have to configure it to stream a different one. Launch Sunshine, and log into the web administrative panel.
Go to Configuration -> Audio/Video -> fill Adapter Name and Output Name

To get the above values to fill in, open a Command Prompt and run:
"C:\Program Files\Sunshine\tools\dxgi-info.exe"
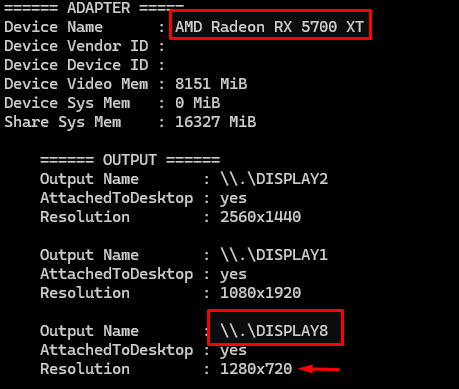
For Adaptor Name, it should be your graphics card. In my sample output here, it is AMD Radeon RX 5700 XT
====== ADAPTER =====
Device Name      : AMD Radeon RX 5700 XT
Device Vendor ID : 0x00001002
For Output Name, it would be the monitor to display. You should be able to guess which monitor it is by the resolution you set in a previous step. In thiis example, my virtual 720 monitor is \\.\Display8(be sure to include the \\.\):
====== OUTPUT ======
Output Name       : \\.\DISPLAY2
AttachedToDesktop : yes
Resolution        : 2560x1440

Output Name       : \\.\DISPLAY1
AttachedToDesktop : yes
Resolution        : 1080x1920

Output Name       : \\.\DISPLAY8
AttachedToDesktop : yes
Resolution        : 1280x720
For completeness, this is how the entire output looks like, what you should look for and what the Sunshine config should look like after you’re done:


Then save and apply to re-launch Sunshine with your new configuration.
** Note: The Output Name does seem to change once in a while. If you’re seeing an error sometime in the future when connecting in, this is likely the issue.
Moonlight (“The Client”) Configuration
Now download Moonlight on your Android TV. If you instead have an external device such as a Raspberry Pi or some other computer connected to the TV, you can also opt to use that.
Instructions for other OSes:
https://moonlight-stream.org/
For my Android TV OS, it is accessible on the Google Play Store.
Once installed, just launch it and it should scan your local network for your Sunshine Server automatically. When prompted, key in the pairing code and you’re good to go. Connect to your server and select “Desktop”. If everything goes smoothly, you should see your desktop(or virtual monitor desktop).
Finally launching the game
Run Beat Saber on your headset, then go to your PC and focus the game window. You can then use Alt + Enter to enter fullscreen, and Win + Shift + (left or right key depending on where you put the virtual monitor) to move it to the virtual monitor. If you look on your TV, it should be there now.
If you need to get it back on a real monitor, win or alt + tab, select the BS window and repeat the previous keys to move it back.

As you can see above, my average latency is 1+2.7+1.87ms, for a total of just below 6ms!
Closing
I hope that this quickly put together guide has been helpful to at least someone out there. If I have the time and energy in the future, I will add pictures and make it easier to follow. But in the meantime, it’s back to trying to be a Beat Saber Jedi (and studying for more certs lol D:).
Cheers!
J